	.global _start

_start:
	mov x0, #1
	ldr x1, =msg
	ldr x2, =len
	mov x8, #64
	svc #0

	mov x8,	#93
	mov x0, #0
	svc #0

msg:
	.ascii "hello world\n"
len = . - msg
blog
A pattern for using modal dialogs in Laravel

First let me explain the context of the solution I am trying to deliver, and the pain point I want to solve. I was writing a dashboard, and I wanted to have Modal pop ups that allow the end user to add items to the dashboard without leaving the dashboard.
Modal dialogs from Bootstrap seem like a nice approach. However, I was unhappy with nesting the code for the modal forms in the same file as the dashboard. Besides the clutter, it increases the size of the page to be downloaded considerably.
I decided to keep the modals in their own views, and return them from the controller to the dashboard using a client side fetch. The benefits of this are that you are effectively lazy loading the modal if and only if the modal form is requested by the user.
Let’s take a look at a simple example. Here we have a dashboard that contains a list of tasks. It is feasible that we want to add a task to the dashboard without actually leaving the dashboard.
For brevity we will not use a database, rather just return a hard coded array from the task controller’s index method to populate our dashboard.
First let’s set up our react project …
$>npx create-react-app react-bootstrap-modals
Switch down one level
$>cd bootstrap-modals/
And install laravel ui
$>composer require laravel/ui
Then install bootstrap scaffolding …
$>php artisan ui bootstrap
Then install laravel collective
$>composer require laravelcollective/html
Now run npm install
$>npm install
Now remove the welcome page
$>rm resources/views/welcome.blade.php
And create two resource controllers. One is for our dashboard, one for our modal tasks form.
$>php artisan make:controller DashboardController --resource
$>php artisan make:controller TaskController --resource
Then create the folder for the Dashboard view and create the dashboard view blade file
$>mkdir resources/views/dashboard
$>touch resources/views/dashboard/index.blade.php
Then create the folder for the Task modal view and create the blade file.
$>mkdir resources/views/task
$>touch resources/views/task/create.blade.php
And the final piece of scaffolding is to add the routes.
Change your routes/web.php file to look like this :
<?php

use Illuminate\Support\Facades\Route;

Route::resource('dashboard', 'DashboardController');
Route::resource('task', 'TaskController');
Now we can spin it all up …
$>php artisan serve
Then visit http://localhost:8000/dashboard
Of course it is currently just a blank page
Firstly let’s add some data to the view. Edit the index method in the controller in app/Http/Controllers/DashboardController.php
So our index method looks like …
public function index()
   {
       return view("dashboard.index");
   }
and our view looks like …
<h1>Dashboard</h1>
Create a sub folder under the views directory called layout. Create a file in this directory called layout.blade.php and add the following content
<!doctype html>
<html lang="{{ str_replace('_', '-', app()->getLocale()) }}">
<head>
   <meta charset="utf-8">
   <meta name="viewport" content="width=device-width, initial-scale=1">

   <!-- CSRF Token -->
   <meta name="csrf-token" content="{{ csrf_token() }}">

   <title>{{ config('app.name', 'Laravel') }}</title>

   <!-- Scripts -->
   <script src="{{ asset('js/app.js') }}" ></script>

   <!-- Fonts -->
   <link rel="dns-prefetch" href="//fonts.gstatic.com">
   <link href="https://fonts.googleapis.com/css?family=Nunito" rel="stylesheet">
   <link type="text/css" rel="stylesheet" href="{{ mix('css/app.css') }}">

   <!-- Styles -->
   <link href="{{ asset('css/app.css') }}" rel="stylesheet">
</head>
<body>
   @yield('content')
</body>
</html>
Now edit your index.blade.php in your dashboard directory and add the directive to include the layout in our dashboard index view by adding
@extends('layout.layout')
@section('content')
<h1>Dashboard</h1>
@endsection
Also we want our view content to be displayed in the content section of the layout template so we add the necessary @section and @endsection tag.
So far, ok. Now let’s add a button for adding a task. We will wire up the onclick method to point to a method contained within our index view.
@extends('layout.layout')
@section('content')
<h1>Dashboard</h1>
<button type="button" class='btn btn-success' id='addTask'>+ Add Task</button>
<script>
   $(document).ready(function(){
       $("#addTask").click(function(){
           console.log("Add task");
       });
   });
</script>
@endsection
Next we need to add a placeholder for our add task modal dialog. A div tag is fine for this, and we can give it an id …
@extends('layout.layout')
@section('content')
<h1>Dashboard</h1>
<button type="button" class='btn btn-success' id='addTask'>+ Add Task</button>
<!--modal placeholders-->
<div id='modal-placeholder'></div>
<!--end of modal placeholders-->
<script>
   $(document).ready(function(){
       $("#addTask").click(function(){
           console.log("Add task");
       });
   });
</script>
@endsection
Now we add another view for the task creation by adding a folder called “tasks” under the views folder and adding an create.blade.php in this folder.
Then we can add the following to the create method of our tasks controller.
public function create()
   {
       return view('task.create');
   }
And add the following content to the create.blade.php file
<div class="modal" tabindex="-1" role="dialog">
   <div class="modal-dialog" role="document">
       <div class="modal-content">
       <div class="modal-header">
           <h5 class="modal-title">Add Task</h5>
           <button type="button" class="close" data-dismiss="modal" aria-label="Close">
           <span aria-hidden="true">×</span>
           </button>
       </div>
       <div class="modal-body">
           {!! Form::open(['method' => 'post','enctype' => 'multipart/form-data', 'id' => 'add-task-form']) !!}
               @csrf
               <div class="form-group">
                   {{Form::label('task_label', 'Task')}}
                   {{Form::text('task', '', ['class' => 'form-control', 'placeholder' => 'E.g. wash car', 'required'])}}
               </div>
           {!! Form::close() !!}
       </div>
       <div class="modal-footer">
           <button type="button" class="btn btn-primary" id='add_task_submit'>Save changes</button>
           <button type="button" class="btn btn-secondary" data-dismiss="modal">Close</button>
       </div>
       </div>
   </div>
</div>
Note that we don’t add the layout template, as this is just the content of our modal form which will be injected into our div placeholder in the dashboard. Also note the @csrf declaration just inside the Form::open statement. This will include the cross site request antiforgery token.
And we can test the view by visiting the URL we will be calling in the button click event in our dashboard.
http://localhost:8000/task/create

It hasn’t got its Sunday best on as it has not got any of the bootstrap styles loaded, but it will have when we inject it into our div in our dashboard view, which does. At this stage all we are checking is that the route, controller and view are working correctly.
So we know our modal works as a page in itself, it should work fine as a modal.
We need to make the following changes to our index view :
@extends('layout.layout')
@section('content')
<h1>Dashboard</h1>
<button type="button" class='btn btn-success' id='addTask' value = {{ route('task.create') }}>+ Add Task</button>
<!--modal placeholders-->
<div id='modal-placeholder'></div>
<!--end of modal placeholders-->
<script>
   $(document).ready(function(){
       $("#addTask").click(function(){
           var url = $(this).val();
           $('#modal-placeholder').load(url, function (){
               $('.modal').modal('show');
           });
       });
   });
</script>
@endsection
As you can see we have added a value to our button that is the url of our modal, by using the laravel route method from the laravel router. This is then retrieved in our click function and supplied to the load method. We also supply a callback to the load method and in there we can call the modal to show it.
Now when we click on the + Add Task button the dashboard should dim with an overlay, and the modal form should appear

The final thing to do is to add the code that will receive the form post data when the user clicks on the “Save changes” button. As we’re not using a database, we will just echo the request contents back in the response object.
First we need to add the following to the store method on our task controller :
public function store(Request $request)
   {
       return $request;
   }
And then we can add the following to our dashboard view …
$(document).on('click', "#add_task_submit", function(e) {
     e.preventDefault();
     e.stopPropagation();
     fetch('task', {
       method: 'POST',
       headers: {
         'X-CSRF-TOKEN': $('meta[name="csrf-token"]').attr('content'),
         'Content-Type': 'application/x-www-form-urlencoded'
       },
       body : $('#add-task-form').serialize()
       })
     .then((response) => {
       return response.text();
     })
     .then((data) => {
       console.log(data);
     });
     e.preventDefault();
     e.stopPropagation();
     $('.modal').modal('hide');
     return false;
   });
A few points to note.
We are suppressing the default events as we don’t actually want the form to be submitted.
The document click event is listened to. This is because the modal form was loaded *after* the page loaded, so any attempt to listen to any of the components on the modal dialog would not be wired up correctly.
We are setting the cross site request antiforgery token on the HTTP headers.
We are serialising the contents of the form in the body of the request.
The response is sent to the console so you will need to nudge F12 to see the response working effectively.
Future thoughts :
We could change the add button on the dashboard to check if the modal form dialog has already been loaded, and not re-load every time the button is pushed.
You can find the code for this post at https://github.com/suityou01/blog/tree/master/laravel/bootstrap4/modals
Autocomplete Web Component

Building on my previous article about testing web components I ran into a problem with a current development project that I felt a lightweight web component would be a good solution for. So I built one, documented it, and put it up on github for you all to use if you identify a similar need.
So the issue I had was to do with my current project, which is an online fitness studio for a startup enterprise called Home-Fit. The system requires that I can stream content from the instructor’s webcam into the homes of the delegates. For this to happen I need to be able to define a session, which of course is a period of time, scheduled to take place at a given time, with an instructor, and delegates.
So I need to be able to search for delegates, and add multiple delegates to a session. A dropdown list just seems clunky to me, and would need a separate box to store the items selected from the list. In a system of x 1000 delegates some sort of autosearch box is a far better bet. Something that searches as you type and gives you a list of suggestions as you type.
So thinking about this, I wanted to deliver something that can handle single selections, multiple selections, and gives the developer control over the way the suggestions are displayed, in the form of an html template.
I also wanted something that can plug into any REST api, and any shape of JSON data. So even if your api is returning data that is 5 levels deep, and the field names differ from the defaults of ‘ID’ and ‘Name’, no problem, just configure the control accordingly and off you go.
So the first example is a single select, that searches for a list of countries from the endpoint https://restcountries.eu/rest/v2/name/
This will return you some JSON that looks like this, if your search term was ‘afgh’ :
[{"name":"Afghanistan","topLevelDomain":[".af"],"alpha2Code":"AF","alpha3Code":"AFG","callingCodes":["93"],"capital":"Kabul","altSpellings":["AF","Afġānistān"],"region":"Asia","subregion":"Southern Asia","population":27657145,"latlng":[33.0,65.0],"demonym":"Afghan","area":652230.0,"gini":27.8,"timezones":["UTC+04:30"],"borders":["IRN","PAK","TKM","UZB","TJK","CHN"],"nativeName":"افغانستان","numericCode":"004","currencies":[{"code":"AFN","name":"Afghan afghani","symbol":"؋"}],"languages":[{"iso639_1":"ps","iso639_2":"pus","name":"Pashto","nativeName":"پښتو"},{"iso639_1":"uz","iso639_2":"uzb","name":"Uzbek","nativeName":"Oʻzbek"},{"iso639_1":"tk","iso639_2":"tuk","name":"Turkmen","nativeName":"Türkmen"}],"translations":{"de":"Afghanistan","es":"Afganistán","fr":"Afghanistan","ja":"アフガニスタン","it":"Afghanistan","br":"Afeganistão","pt":"Afeganistão","nl":"Afghanistan","hr":"Afganistan","fa":"افغانستان"},"flag":"https://restcountries.eu/data/afg.svg","regionalBlocs":[{"acronym":"SAARC","name":"South Asian Association for Regional Cooperation","otherAcronyms":[],"otherNames":[]}],"cioc":"AFG"}]
And this is the implementation of our web component. This is only a handful of the attributes that have been implemented in this version. This says where to get the JSON from (url), the width of course, which is any valid width value, including em or percentages, nokeyword means there is no querystring required so the search term is just appended to the url, the placeholder is the same as any other HTML input field placeholder.
<ac-input url='https://restcountries.eu/rest/v2/name/' width='250px' nokeyword=true placeholder='Select country' ></ac-input>

Now you play…
This is nice enough, but doesn’t address my initial problem, but I wanted to address several different use cases with the one control as I felt this would be useful for future projects. By simply adding the attribute multiselect it drives a little differently. Take a look below.
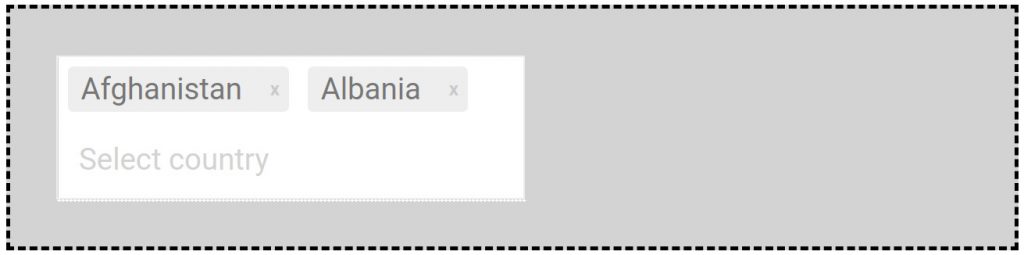
Try it out yourself …
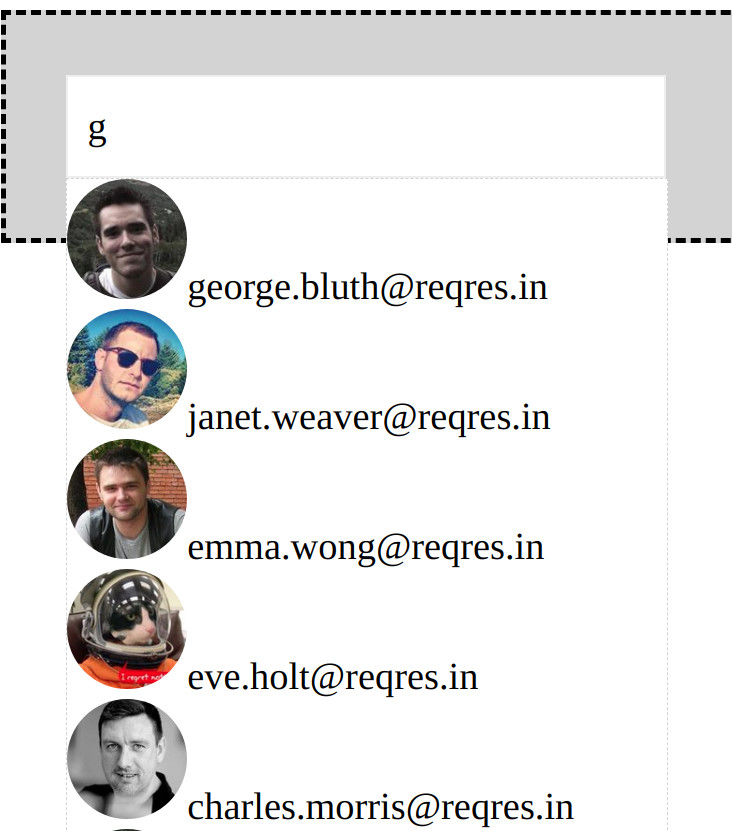
And that HTML template stuff, and destructuring attribute gives you full control over how to display your autocomplete suggestions and where to get the data from in the JSON format returned. The URL https://reqres.in/api/users?page=1 returns something that looks like this
{"page":1,"per_page":6,"total":12,"total_pages":2,"data":[{"id":1,"email":"[email protected]","first_name":"George","last_name":"Bluth","avatar":"https://s3.amazonaws.com/uifaces/faces/twitter/calebogden/128.jpg"},{"id":2,"email":"[email protected]","first_name":"Janet","last_name":"Weaver","avatar":"https://s3.amazonaws.com/uifaces/faces/twitter/josephstein/128.jpg"},{"id":3,"email":"[email protected]","first_name":"Emma","last_name":"Wong","avatar":"https://s3.amazonaws.com/uifaces/faces/twitter/olegpogodaev/128.jpg"},{"id":4,"email":"[email protected]","first_name":"Eve","last_name":"Holt","avatar":"https://s3.amazonaws.com/uifaces/faces/twitter/marcoramires/128.jpg"},{"id":5,"email":"[email protected]","first_name":"Charles","last_name":"Morris","avatar":"https://s3.amazonaws.com/uifaces/faces/twitter/stephenmoon/128.jpg"},{"id":6,"email":"[email protected]","first_name":"Tracey","last_name":"Ramos","avatar":"https://s3.amazonaws.com/uifaces/faces/twitter/bigmancho/128.jpg"}]}
So we have to dig into the subitem data, and our fields of interest are the email field and the avatar field looks useful to us.
<div id='multipletemplate' class="section">
                <ac-input url='https://reqres.in/api/users?page=2' width='250px' nokeyword=true subitem=data placeholder='Select user' multiselect itemtemplate="<div class='resultItem' id='${id}'><img src='${avatar}' style='border-radius:50%; width:50px; height:50px;'/>${email}</div>"></ac-input>
Note the use of a single mustache in the string interpolation. This is deliberate to keep it below the radar of any other string interpolation libraries you may be using, like mustache.js, which uses {{}}.
So there you have it. A versatile web component that addresses a number of different use cases and provides enough flexibility to the developer to use in many different scenarios. You could use it in an email app to build a TO list of email addresses, or use it to select multiple invoices for processing with a grid preview of the invoice information.
I would love to hear your feedback, either here or on github where you can find the project. https://github.com/suityou01/autocomplete-
Web component development, the test first way.

If you’ve done javascript development with testing frameworks before, and written web components before then this article is for you. If you are curious about web components then this article is also for you as it covers some of the basics of creating a web component, and sets out the basic principles of testing those functionalities.
There is of course a link to the source code in an obligatory git repository at the end of the article.
This article assumes you understand what a web component is and why you would want to create on. For more information please view https://developer.mozilla.org/en-US/docs/Web/Web_Components
In this post I will be creating an open shadowroot component. For more information on shadowroot components please view https://developer.mozilla.org/en-US/docs/Web/Web_Components/Using_shadow_DOM
This article also assumes you are familiar with Karma and Jasmine. For more information please view http://karma-runner.github.io/4.0/intro/configuration.html and https://jasmine.github.io/ respectively.
For this example we will be using Google Chrome, if you do not already have it installed, you can get it from here https://www.google.com/chrome/
All development was done on Ubuntu 18.04
Initial environment setup and configuration
mkdir bddwebcomponent
cd bddwebcomponent
npm init
Then supply the options to npm init as follows :
package name: (bddwebcomponent) <Enter your desired package name or stick with default>
version: (1.0.0) <Enter to stick with default>
description: <Enter for nothing or add a description>
entry point: (index.js) <Enter to accept default>
test command: <Enter karma start karma.conf.js>
git repository: <Probably a good idea>
keywords: <Add some if you like>
author: <No time to be shy>
license: <Leave blank or add one, eg GPL-3.0-or-later
Is this OK? (yes) <Enter yes or you will have just wasted your time>
ls
> package.json
Now install Karma
npm i karma --save-dev

ls
>node_modules  package.json  package-lock.json
Now configure Karma
karma init karma.conf.js
And supply the following values
Which testing framework do you want to use ?
Press tab to list possible options. Enter to move to the next question.
> jasmine <Press enter>

Do you want to use Require.js ?
This will add Require.js plugin.
Press tab to list possible options. Enter to move to the next question.
> no <Press enter>

Do you want to capture any browsers automatically ?
Press tab to list possible options. Enter empty string to move to the next question.
> Chrome <Press enter twice>

What is the location of your source and test files ?
You can use glob patterns, eg. "js/*.js" or "test/**/*Spec.js".
Enter empty string to move to the next question.
> <Enter test/**/*.js> NB This glob pattern means all files with the file extension of .js in the test folder.
<Press enter again to ignore the warning ‘WARN [init]: There is no file matching this pattern.’

Should any of the files included by the previous patterns be excluded ?
You can use glob patterns, eg. "**/*.swp".
Enter empty string to move to the next question.<Enter empty string>

Do you want Karma to watch all the files and run the tests on change ?
Press tab to list possible options.
> yes <Enter to accept default>
ls

>karma.conf.js  node_modules  package.json  package-lock.json
Edit karma.conf.js in your text editor of choice and change
// list of files / patterns to load in the browser
    files: [
      'test/**/*.js'
    ],
to
// list of files / patterns to load in the browser
    files: [
      { pattern: 'test/**/*.js', type: 'module', included: true },
      { pattern: 'src/**/*.js', included: false },
    ],
Otherwise when you try and run any tests that use the import keyword to import modules will error with the following :
An error was thrown in afterAll
SyntaxError: Cannot use import statement outside a module
And now we can create our test and source code folders and the source file for our web component and test file respectively.
mkdir test
mkdir src

touch src/bddtodos.js
touch test/bddtodostests.js
A brief description of what we are going to build
It will consist of a button, the button will read “Get ToDos” and when pressed will fetch a list of ToDos from https://jsonplaceholder.typicode.com/ and display them underneath the button.
The web component will be called bdd-todos and have the following html tag <bdd-todos>
Now time to do some coding
First we need some boilerplate to set up our basic web component. Open the bddtodos.js file in your editor of choice, and add the following :
export class BDDTodos extends HTMLElement{
	constructor(){
		super();
		var shadow = this.attachShadow({mode: 'open'});
	}
}
customElements.define('bdd-todos', BDDTodos);
And now to add our first test case to jasmine, open bddtodotests.js and add the following :
import { BDDTodos } from "../src/bddtodos.js"

describe("BDD Todos Component", () => {
	it("creates itself", async () => {
		const f = (await document.createElement('bdd-todos'));
		expect(f).toBeTruthy();
	})
});
Now run it …
karma start karma.conf.js

>Executed 1 of 1 SUCCESS
Now let’s take it up a notch. We need to add our button.
First we add a template string to our class, then create a template element from this string, then clone the template into our shadow root.
We end up with a code listing like below :
export class BDDTodos extends HTMLElement{

	constructor(){
		super();
		this.template = `<button id='gettodos'>Get Todos</button>`;

		var t = document.createElement('template');
		t.id = 'bdd-todos-template';
		t.innerHTML = this.template;
		var shadow = this.attachShadow({mode: 'open'})
			.appendChild(t.cloneNode(true));
	}
}
customElements.define('bdd-todos', BDDTodos);
Please note I have used backticks for the template. This is for 2 reasons.
Firstly you could split the template across multiple lines to make it more readable, particularly if the template was something more complex.
Secondly I prefer to enclose html attribute values in single quotes, and this is only possible if my outer quotation marks are something other than single quotes. Double quotes would work for the outer quotation marks but then the first point would not be possible. It is up to you. You could also take advantage of the new template literals functionality of ES6, which you can read more about here https://developer.mozilla.org/en-US/docs/Web/JavaScript/Reference/Template_literals
Now we need an additional test in our test suite to make sure this behaviour is working as expected :
it("creates a template in the shadow root", async () => {
		const f = document.createElement('bdd-todos');
		expect(f.shadowRoot.innerHTML).toEqual('<template id="bdd-todos-template"><button id="gettodos">Get Todos</button></template>');
	})
The next behaviour that we want to develop is that our button sends a request to the appropriate REST api when clicked. The first challenge is that we have to simulate a button click.
This will of course need a new test fixture, and this time around we will develop the test first, as we would normally do, but in the previous example did not, for the sake of the explanation and to the cost of best practice.
it("fires a button_click function when the button is clicked", async () => {
		const f = document.createElement('bdd-todos');
		/*Create our synthetic button click here*/
		var e = new Event('MouseEvent',{ type: 'click', button: 0 });
		/*Get a reference to the button to send the click to*/
		var b = f.shadowRoot.getElementById('gettodos');
		/*Create a spy on the button_click function*/
		var s = spyOn(f,'button_click');
		/*Dispatch the event to the button*/
		b.dispatchEvent(e);
		/*Expect that the button_click event was called*/
		expect(s).toHaveBeenCalledTimes(1);
	})
What I would like to draw your attention to is that I have declared a variable b, that references the button we wish to simulate being clicked. Then I have created a new MouseEvent, and sent with it button ‘0’ which is the left mouse button. We could simulate all sorts of events in our test cases, including Keyboard events such as keydown, key up. Also I am using a Jasmine spy to observe any calls to the button_click method.
For more information on dispatching custom Events please see here https://javascript.info/dispatch-events
Now we would expect our test to fail as we haven’t created a function in our web component called button_click. Running the tests confirms this …
Error: <spyOn> : button_click() method does not exist
        Usage: spyOn(<object>, <methodName>)
            at <Jasmine>
            at UserContext.<anonymous> (test/bddtodostests.js:19:11)
            at <Jasmine>
Chrome 78.0.3904 (Linux 0.0.0): Executed 3 of 3 (1 FAILED) (0.012 secs / 0.004 secs)
TOTAL: 1 FAILED, 2 SUCCESS
So let’s add the method to the web component.
export class BDDTodos extends HTMLElement{

	constructor(){
		super();
		this.template = `<button id='gettodos'>Get Todos</button>`;

		var t = document.createElement('template');
		t.id = 'bdd-todos-template';
		t.innerHTML = this.template;
		var shadow = this.attachShadow({mode: 'open'})
			.appendChild(t.cloneNode(true));
	}

	button_click(e){}
}
customElements.define('bdd-todos', BDDTodos);
This certainly solves the error, but now we have a new one …
TypeError: Cannot read property 'dispatchEvent' of null
            at <Jasmine>
            at UserContext.<anonymous> (test/bddtodostests.js:21:5)
            at <Jasmine>
Chrome 78.0.3904 (Linux 0.0.0): Executed 3 of 3 (1 FAILED) (0.025 secs / 0.014 secs)
TOTAL: 1 FAILED, 2 SUCCESS
Our call to getElementById on the shadowroot didn’t return anything. This is because our button is hidden from the DOM as it is wrapped in a template tag. Templates are not a part of the rendered DOM, but we can create DOM elements from them. Kind of like the difference between classes and objects in object oriented programming languages.
So we need to change our class once again to build our button from the template.
We do this using cloneNode.
So our webcomponent now looks like this :
export class BDDTodos extends HTMLElement{

	constructor(){
		super();
		this.template = `<button id='gettodos'>Get Todos</button>`;
		this.attachShadow({mode: 'open'});
		var t=document.createElement("template");
		t.id = "bdd-todos-template";
		t.innerHTML = this.template;
		this.shadowRoot
.appendChild(t);
		var ti = this.shadowRoot.getElementById('bdd-todos-template');
		this.shadowRoot.appendChild(ti.content.firstChild.cloneNode(true));
	}

	button_click(e){}
}
Note that ti is our reference to the template node and we are appending a clone of its first child, our button element. If we did not clone the first child, it would just move it out of the template and into the shadow root.
We also now need to change our second test fixture to :
it("creates a template in the shadow root", async () => {
		const f = document.createElement('bdd-todos');
		expect(f.shadowRoot.innerHTML).toEqual('<template id="bdd-todos-template"><button id="gettodos">Get Todos</button></template><button id="gettodos">Get Todos</button>');
	})
Now when we run the tests we would expect it to complain that our button_click() method has not been called.
Error: Expected spy button_click to have been called once. It was called 0 times.
            at <Jasmine>
            at UserContext.<anonymous> (test/bddtodostests.js:23:13)
            at <Jasmine>
Chrome 78.0.3904 (Linux 0.0.0): Executed 3 of 3 (1 FAILED) (0.025 secs / 0.011 secs)
TOTAL: 1 FAILED, 2 SUCCESS
So our test is working. Now we just need to wire up the event in our web component.
export class BDDTodos extends HTMLElement{

	constructor(){
		super();
		this.template = `<button id='gettodos'>Get Todos</button>`;
		this.shadow = this.attachShadow({mode: 'open'});
		var t=document.createElement("template");
		t.id = "bdd-todos-template";
		t.innerHTML = this.template;
		this.shadowRoot.appendChild(t);
		var ti = this.shadowRoot.getElementById('bdd-todos-template');
		this.shadowRoot.appendChild(ti.content.firstChild.cloneNode(true));
		this.shadowRoot.getElementById('gettodos').addEventListener('click',this.button_click());
	}

	button_click(e){ }
}

customElements.define('bdd-todos', BDDTodos);
Yet when we run our code it still fails with
Error: Expected spy button_click to have been called.
            at <Jasmine>
            at UserContext.<anonymous> (test/bddtodostests.js:24:26)
            at <Jasmine>
Chrome 78.0.3904 (Linux 0.0.0): Executed 3 of 3 (1 FAILED) (0.031 secs / 0.011 secs)
This is because the actual event in the class was fired by the event, but our spy wasn’t. If we re-add the event in our test fixture then the spy is called and it works.
it("It fires a button_click function when the button is clicked", async () => {
		const f = document.createElement('bdd-todos');
		/*Create our synthetic button click here*/
		var e = new Event('MouseEvent',{ type: 'click', button: 0 });
		/*Get a reference to the button to send the click to*/
		var b = f.shadowRoot.getElementById('gettodos');
		/*Create a spy on the button_click function*/
		spyOn(f,'button_click');
		f.addEventListener('click', f.button_click());
		/*Dispatch the event to the button*/
		b.dispatchEvent(e);
		/*Expect that the button_click event was called*/
		expect(f.button_click).toHaveBeenCalled();
	})
Executed 3 of 3 SUCCESS
OK so finally what we need our web component to do is to call a fetch api, in this case the ToDos at https://jsonplaceholder.typicode.com/
But for this to be a true unit test we cannot integrate with an external resource. Instead we have to mock it. This is really easy to do and quite fun.
Firstly we need to start from the expected JSON results and work back from there.
So if we called the TODOs api, with a limit of 5 we would get, from https://jsonplaceholder.typicode.com/todos?_start=0&_limit=5
[
  {
    "userId": 1,
    "id": 1,
    "title": "delectus aut autem",
    "completed": false
  },
  {
    "userId": 1,
    "id": 2,
    "title": "quis ut nam facilis et officia qui",
    "completed": false
  },
  {
    "userId": 1,
    "id": 3,
    "title": "fugiat veniam minus",
    "completed": false
  },
  {
    "userId": 1,
    "id": 4,
    "title": "et porro tempora",
    "completed": true
  },
  {
    "userId": 1,
    "id": 5,
    "title": "laboriosam mollitia et enim quasi adipisci quia provident illum",
    "completed": false
  }
]
So we can add a beforeAll method to build our expected response, and use the same spyOn class to observe the call to the api
beforeAll(function() {
		promisedData =
		[
			{
			  "userId": 1,
			  "id": 1,
			  "title": "delectus aut autem",
			  "completed": false
			},
			{
			  "userId": 1,
			  "id": 2,
			  "title": "quis ut nam facilis et officia qui",
			  "completed": false
			},
			{
			  "userId": 1,
			  "id": 3,
			  "title": "fugiat veniam minus",
			  "completed": false
			},
			{
			  "userId": 1,
			  "id": 4,
			  "title": "et porro tempora",
			  "completed": true
			},
			{
			  "userId": 1,
			  "id": 5,
			  "title": "laboriosam mollitia et enim quasi adipisci quia provident illum",
			  "completed": false
			}
		  ]
	})
Then we will of course need a new test case :
it("It calls a Rest API when the button is clicked", async () => {
		const f = document.createElement('bdd-todos');
		var e = new Event('MouseEvent',{ type: 'click', button: 0 });
		/*This spy not only observes the fetch api call, but it also supplies the response*/
		spyOn(window, 'fetch').and.returnValue(Promise.resolve({ json: () => Promise.resolve(promisedData)}));
		var b = f.shadowRoot.getElementById('gettodos');
		b.dispatchEvent(e);
		/*Check to make sure the fetch api was called, and only called once*/
		expect(window.fetch).toHaveBeenCalledTimes(1);
	})
Note that a response object returned by the fetch api has a json() method, this is just a promise within a promise that returns the stream of json. In this mock we simply wrap a promise around this using an anonymous method that returns a promise which resolves to our JSON data, and map this anonymous method to a function named json. Your web component will not know the difference. 🙂
Of course when we run this we get a fail as expected, as our web component does not make the fetch api call yet, so we get…
Error: Expected spy fetch to have been called once. It was called 0 times.
            at <Jasmine>
            at UserContext.<anonymous> (test/bddtodostests.js:71:24)
            at <Jasmine>
Chrome 78.0.3904 (Linux 0.0.0): Executed 4 of 4 (1 FAILED) (0.022 secs / 0.01 secs)
TOTAL: 1 FAILED, 3 SUCCESS
So we add the following to our button_click method :
 button_click(e){
		fetch('https://jsonplaceholder.typicode.com/todos?_start=0&_limit=5')
			.then(response => response.json())
			.then(data => {
				this.todos = data;
			});
	}
Executed 4 of 4 SUCCESS
So now we know that the fetch api was called, but we cannot prove the data was retrieved successfully. We need to add another check to our last test fixture.
However, what we really should do is add a completely new describe block, run the event in the beforeAll method and then run our tests in our individual test suites, kind of a separation of concerns. We should only be testing outcomes in our specs, in effect.
describe("BDD Todos Component REST API Tests", () => {
	var promisedData;
	var f;
	beforeAll(function() {
		promisedData =
		[
			{
			  "userId": 1,
			  "id": 1,
			  "title": "delectus aut autem",
			  "completed": false
			},
			{
			  "userId": 1,
			  "id": 2,
			  "title": "quis ut nam facilis et officia qui",
			  "completed": false
			},
			{
			  "userId": 1,
			  "id": 3,
			  "title": "fugiat veniam minus",
			  "completed": false
			},
			{
			  "userId": 1,
			  "id": 4,
			  "title": "et porro tempora",
			  "completed": true
			},
			{
			  "userId": 1,
			  "id": 5,
			  "title": "laboriosam mollitia et enim quasi adipisci quia provident illum",
			  "completed": false
			}
		  ];
		f = document.createElement('bdd-todos');
		var e = new Event('MouseEvent',{ type: 'click', button: 0 });
		/*This spy not only observes the fetch api call, but it also supplies the response*/
		spyOn(window, 'fetch')
			.and.returnValue(Promise.resolve({ json: () => Promise.resolve(promisedData)}));

		f.addEventListener('click', f.button_click());

		var b = f.shadowRoot.getElementById('gettodos');
		b.dispatchEvent(e);
	})
	it("calls a Rest API when the button is clicked", async() => {
		expect(window.fetch).toHaveBeenCalledTimes(1);
		expect(f.todos).toEqual(promisedData);
	})
});
Now we know that the rest API was called once, and that the promise returned was successfully processed.
Using the tools here, it would be possible to turn the returned data into a table of results and display them in the component underneath. Each row could be a template that contains a row element that is cloned or you could just create the html elements yourself and append them to the shadowRoot.
Clearly, anything you do can be tested using behavioural driven development in Jasmine, and web components are no exception.
Happy testing!
As promised, the obligatory github code repository can be found here https://github.com/suityou01/unittestwebcomponent